Главная страница Случайная страница
Разделы сайта
АвтомобилиАстрономияБиологияГеографияДом и садДругие языкиДругоеИнформатикаИсторияКультураЛитератураЛогикаМатематикаМедицинаМеталлургияМеханикаОбразованиеОхрана трудаПедагогикаПолитикаПравоПсихологияРелигияРиторикаСоциологияСпортСтроительствоТехнологияТуризмФизикаФилософияФинансыХимияЧерчениеЭкологияЭкономикаЭлектроника
CAUTION_____
|
|

|
The crankshaft may be turned while the camshafts are removed. Always pull the chain taut while turning the crankshaft. This avoids kinking the chain on the lower (crankshaft) sprocket A kinked chain could damage both the chain and the sprocket
Camshaft Installation
•Apply engine oil to all cam parts and journals.
• If a new camshaft is to be used, apply a thin coat of molybdenum disulfide grease to the cam surfaces.
NOTE
О The exhaust camshaft has an EX mark[A] and the inlet camshaft has an IN mark[B]. Be careful not to mix up these shafts.
• Position the crankshaft at #1, 4 piston TDC (see Camshaft Removal).
_ CAUTION
|
The crankshaft may be turned while the camshafts are removed. Always pull the chain taut while turning the crankshaft. This avoids kinking the chain on the lower (crankshaft) sprocket A kinked chain could damage both the chain and the sprocket

|
| IN mark |
| EX mark |
• Pull the tension side (exhaust side) of the chain taut to install the chain.
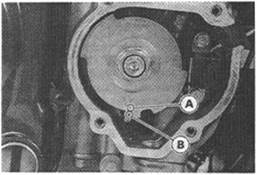
• Engage the camshaft chain with the camshaft sprockets so that the timing marks on the sprockets are positioned as shown.
OThe timing marks must be aligned with the cylinder head upper surface [А].
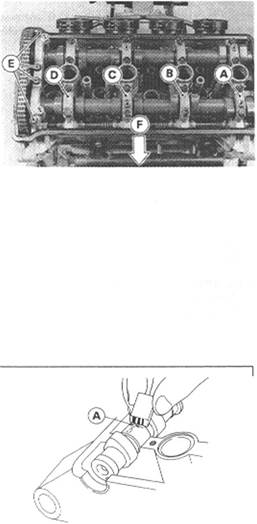
• Install the camshaft caps in the correct locations as shown.
[A] #1 [C] #3

| The camshaft caps are machined with the cylinder head. So, if a cap is installed in a wrong location, the camshaft may seize because of improper oil clearance in the bearings. |
[B] #2 [D] #4
CAUTION
*lf the camshaft journal diameter is less than the service limit, replace
the camshaft with a new one and measure the clearance again. *lf the clearance still remains out of the limit, replace the cylinder head unit.
Camshaft Chain Removal
|
•Split the crankcase (see CrankshaftДгапвгтмэзюп chapter). • Remove the camshaft chain from the crankshaft sprocket.
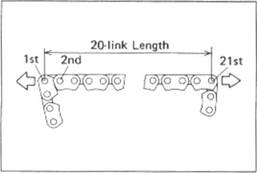
Camshaft Chain Wear
• Hold the chain taut with a force of about 5 kg in some manner, and measure a 20-link length. Since the chain may wear unevenly, take measurement at several places. *lf any measurement exceeds the service limit, replace the chain.
Camshaft Chain 20-link Length
Standard: 127.00 - 127.36 mm Service Limit: 128.9 mm
Rocker Shaft, Rocker Arm
Rocker Shaft Rocker Arm Removal • Remove:
Engine (see Engine Removal/Installation)
Camshafts (see Camshaft Removal)
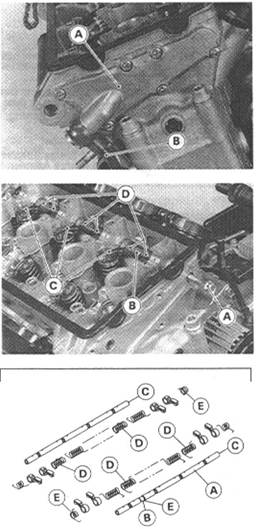
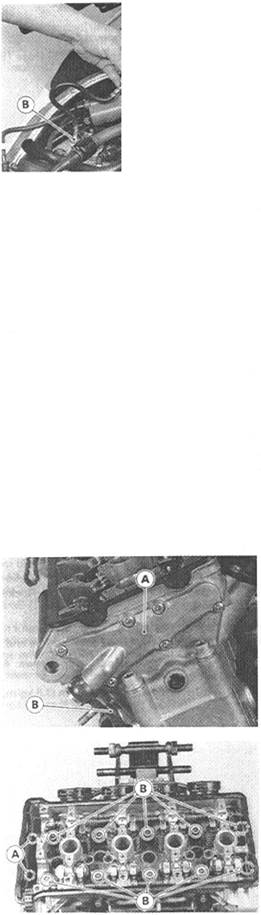
Left Cylinder Head Cover [A] and Oil Hose [B]
• Using a suitable bolt (M8 P1.25 x more than 20 mm long) [A], pull the rocker shaft [B] out
• Remove the rocker arms [C] and springs [D].
О Mark and record the rocker arm locations so that the rocker arm can be reinstalled in their original positions.
Rocker Shaft Rocker Arm Installation •Apply engine oil to all the rocker amis and the rocker shafts. OThe inlet rocker shaft [A] has a blue paint mark and a groove [В]. Be careful not to mix up the inlet and exhaust rocker shafts.
• Install the rocker shaft from the left side of the cylinder head so that the plug [C] end goes in first.
• Install the rocker arms in their original positions.
• Install the spring as shown.
[D] Red Paint
|
[E] Blue Paint

|
Cylinder Head
Cylinder Compression Measurement
•Warm up the engine thoroughly.
•Stop the engine, and remove the spark plugs.
Special Tool - Spark Plug Wrench, 16mm: 92110-1154
• Measure the cylinder compression.
О Using the starter motor, turn the engine over with the throttle fully open until the compression gauge stops rising; the compression is the highest reading obtainable.
Special Tools - Compression Gauge: 57001-221 [A]
Compression Gauge Adapter, M10 X 1.0: 57001-1317
[B]
NOTE
О Be sure the battery is fully charged. О Be sure no air leaks out of the cylinder head gasket.
Cylinder Compression Usable Range: 960 ~ 1470 kPa (9.8 ~ 15.0 kg/cm', 139 ~ 213 pal) @ 340 r/mln (фт)
О Repeat the measurement for the other cylinder.
*lf cylinder compression is higher than the usable range, check the following:
(1) Carbon build-up on the cylinder head combustion chamber and the piston crown.
(2) Cylinder head gasket is not the original part.
(3) Valve stem oil seals and/or piston rings are damaged.
*lf cylinder compression is lower than the usable range, check the following:
(1) Condition of the valve seat is wrong.
(2) Valve clearance is too small.
(3) Piston/cylinder clearance is excessive.
(4) Cylinder head is warped and/or head gasket is damaged.
(5) Piston ring/piston ring groove clearance is excessive.
Cylinder Head Removal • Remove:
Engine (see Engine Removal/Installation chapter)
Cylinder Head Cover (see Cylinder Head Cover Removal)
Camshaft Chain Tensioner (see Camshaft Chain Tensioner Removal)
Camshafts (see Camshaft Removal)
Left Cylinder Head Cover [A] and Oil Hose [B]
Cylinder Head Installation
|
•Install a new cylinder head gasket with " UP" (A] marked side facing up.
NOTE
О The camshaft caps are machined with the cylinder head so if a new cylinder head is installed, use the caps that are supplied with the new head.
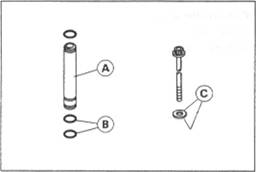
•When the air suction pipes [A] are removed, install the pipes so that

|
the two O-rings [B] side faces down (cylinder head side). •Apply engine oil to both sides [C] of the cylinder head bolt washers.
•Install the 10 mm bolts. Place the cut head bolts [A] in the rear holes. •Tighten the 10 mm cylinder head bolts following the tightening sequence [1 ~ 10].
Torque - Cylinder Head Bolts (10mm):
First. 20 N-m (2.0 kg-m, 14.5 ft-lb)
Final
New Bolts 54 N-m (5.5 kg-m, 40 ft-lb) Used Bolts 49 N-m (5.0 kg-m, 38 ft-lb)
•Tighten the 6 mm cylinder head bolts [11 -12].
Torque - Cylinder Head Bolts (6 mm): 12 N-m (1.2 kg-m, 104 in-lb)
• Install the left cylinder head cover. Be careful not to pinch the O-ring. •Tighten the left cylinder head cover screws and oil hose banjo bolt.
| стзв |

|

|
Torque - Left Cylinder Head Cover Screws: 4.9 N-m (0.50 kg-m, 43 in-lb)
Oil Hose Banjo Bolt 34 N-m (3.5 kg-m, 25 ft-lb)
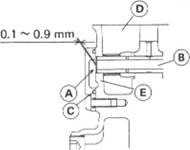
•Install the front camshaft chain guide [A] with its projection [B] up. Push the guide all the way down. [C] Rear Camshaft Chain Guide
4-16 ENGINE TOP END Valves
Valve Clearance Adjustment
NOTE
О Valve clearance must be checked and adjusted when the engine is cold (at room temperature).
• Remove:
Right Lower Fairing (see Frame chapter) Coolant Reserve Tank Pickup Coil Cover
Cylinder Head Cover (see Cylinder Head Cover Removal)
• Using a thickness gauge [A], measure the valve clearance between the rocker ami [B] and the shim [С].
О When positioning #4 piston TDC at the end of the compression stroke:

|
| mi |
| ; Measuring Valve |
Inlet valve clearance of #2 and #4 cylinders Exhaust valve clearance of #3 and #4 cylinders

|
©©©
О When positioning #1 piston TDC al the end of the compression stroke:
Inlet valve clearance of #1 and #3 cylinders Exhaust valve clearance of #1 and #2 cylinders
en*
ф; Measuring Valve
in®©©

|
SI Z2 #3 #4
Valve Clearance
Standard: IN: 0.18 - 0.23 mm EX: 0.21 ~ 0.28 mm

|
*lf the valve clearance is not within the specified range, first record the clearance, and then adjust it.
•To change the valve clearance, slide the rocker arm [A] sideways and change the shim [В]. Replace the shim with one of a different thickness.
NOTE
О Mark and record the shim locations so that the shims can be reinstalled in their original positions.
•To select a new shim which brings the valve clearance within the
specified range, refer to the Valve Clearance Adjustment Charts. •Apply a thin coat of molybdenum disulfide grease to the rocker arms. ORemeasure any valve clearance that was adjusted. Readjust if necessary.
|
|