Главная страница Случайная страница
Разделы сайта
АвтомобилиАстрономияБиологияГеографияДом и садДругие языкиДругоеИнформатикаИсторияКультураЛитератураЛогикаМатематикаМедицинаМеталлургияМеханикаОбразованиеОхрана трудаПедагогикаПолитикаПравоПсихологияРелигияРиторикаСоциологияСпортСтроительствоТехнологияТуризмФизикаФилософияФинансыХимияЧерчениеЭкологияЭкономикаЭлектроника
CAUTION__ _____
|
|
|
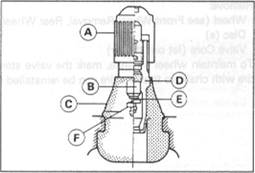
Do not use engine oil or petroleum distillates to lubricate the stem because they will deteriorate the rubber.
[A] Valve Cap [C] Stem Seal [E] Valve Seat
[B] Valve Core [D] Valve Stem [F] Valve Opened
•Apply a soap and water solution, or rubber lubricant to the rim flange and tire beads.
• Check the tire rotation mark on the front and rear tires and install them on the rim accordingly.
NOTE
О The direction of the tire rotation [A] is shown by an arrow [B] on the tire sidewall.
• Position the tire on the rim so that the valve is at the tire balance mark (the chalk mark made during removal, or the yellow paint mark on a new tire).
• Install the tire on the rim using a suitable commercially available tire changer.
• Lubricate the tire beads and rim flanges with a soap and water solution or rubber lubricant to help seat the tire beads in the sealing surfaces of the rim while inflating the tire.

|
• Center the rim in the tire beads, and inflate the tire with compressed air until the tire beads seat in the sealing surfaces.
AWARNING
Be sure to Install the valve core whenever Inflating the tire, and do not inflate the tire to more than 400 kPa(4.0 kg/cm2, 57 psi). Overin- flation can explode the tire with possibility of Injury and loss of life.
• Check to see that the rim lines [A] on both sides of the tire sidewalls are parallel with the rim flanges.
• If the rim flanges and tire sidewall rim lines are not parallel, remove the valve core.
• Lubricate the rim flanges and tire beads.
• Install the valve core and inflate the tire again.
•After the tire beads seat in the rim flanges, check for air leaks.
О Inflate the tire slightly above standard inflation.
О Use a soap and water solution or submerge the tire, and check for bubbles that would indicate leakage.
•Adjust the air pressure to the specified pressure.
•Install the brake disc(s) so that the disc rotation mark aligns with the tire rotation.
•Adjust the wheel balance.
Repair

|
Currently two types of repair for tubeless tires have come into wide use. One type is called a temporary (external) repair which can be carried out without removing the tire from the rim, and the other type is called permanent (internal) repair which requires tire removal. It is generally understood that higher running durability is obtained by permanent (internal) repairs than by temporary (external) ones. Also, permanent (internal) repairs have the advantage of permitting a thorough examination for secondary damage not visible from external inspection of the tire. For these reasons, Kawasaki does not recommend temporary (external) repair. Only appropriate permanent (internal) repairs are recommended. Repair methods may vary slightly from make to make. Follow the repair methods indicated by the manufacturer of the repair tools and materials so that safe results can be obtained.
Hub Bearing
Hub Bearing Removal •Remove the wheel, and take out the following. Collars
Coupling (out of rear hub)
Grease Seals
Circlips
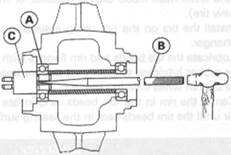
Special Tool - Inside Circlip Pliers: 57001-143 [A]
|
Speedometer Gear Drive [B] (out of front hub)
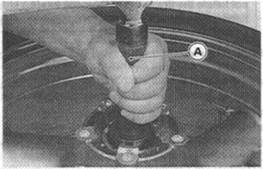
•Take the bearings [A] out of the hub.
_____________________ CALmON_____________________
Do not lay the wheel on the ground with the disc facing down. This can damage or warp the disc. Place blocks under the wheel so that the disc does not touch the ground.
Special Tools - Bearing Remover Shaft: 57001-1265 [B]
|
Bearing Remover Head, Ф25 x Ф28: 57001-1346 [C]
Hub Bearing Installation
• Before installing the wheel bearings, blow any dirt or foreign particles out of the hub with compressed air to prevent contamination of the bearings.
• Replace the bearings with new ones.
• Press in the bearings until they are bottomed.
Special Tool - Bearing Driver Set: 57001-1129 [A]
NOTE

О Install the bearings so that the marked side faces out.
• Replace the circlips with new ones.
Special Tool - Inside Circlip Pliers: 57001-143
• Replace the grease seals with new ones.
• Press in the grease seals so that seal surface is flush with the end of the hole.
О Apply high temperature grease to the grease seal lips. Special Tool - Bearing Driver Set: 57001-1129 [A]
Hub Bearing Inspection
NOTE
О It is not necessary to remove any bearings for inspection. If any bearings are removed, they will need to be replaced with new ones.
•Spin it by hand to check its condition.
*lf it is noisy, does not spin smoothly, or has any rough spots, it must

|
be replaced. • Examine the bearing seal for tears or leakage. *lf the seal is torn or is leaking, replace the bearing.
Speedometer Gear Housing
Disassembly and Assembly
NOTE
О It is recommended that the assembly be replaced rather than attempting to repair the components.

|
• Install the speedometer gear housing so that it fits in the speedometer gear drive notches (see Front Wheel Installation).
Lubrication
• Clean and grease [A] the speedometer gear housing [В].
|
|