Главная страница Случайная страница
Разделы сайта
АвтомобилиАстрономияБиологияГеографияДом и садДругие языкиДругоеИнформатикаИсторияКультураЛитератураЛогикаМатематикаМедицинаМеталлургияМеханикаОбразованиеОхрана трудаПедагогикаПолитикаПравоПсихологияРелигияРиторикаСоциологияСпортСтроительствоТехнологияТуризмФизикаФилософияФинансыХимияЧерчениеЭкологияЭкономикаЭлектроника
Глава 1: Длинная извилистая дорога
|
|
The middle game of Go is distinguished by the hand-to-hand fighting that takes place as both players strive to improve their positions. In the fuseki or opening phase, Black and White often sketch out their prospective territories and divide the area of the board between them. In this type of game, the first part of the middle game is to find some way of reducing or invading the enemy's territorial frame-work. In the execution of such maneuvers, severe fighting will usually result. Furthermore the attacker or invader is usually at a disadvantage in such fights as he is forced to struggle within the enemy's sphere of influence and there is the added danger that the fighting may spread and even spill over into the invader's own 'secure' territory. Consequently, good judgement and techniques are essential to the successful execution of such an operation.
The problem of how to carry out the reduction or invasion is so much part of every game that certain standard methods have been developed. These are what might be called joseki of the middle game and cover a. vast range of possible variations which are applicable to the most commonly found situations. In this chapter therefore, a considerable portion of the discussion of the middle game will center around various ways to invade (and reduce) a large moyo based on the kogeima shimari.
 |
Fig. 1 (1-19)
The game chosen for this study was taken from the 2nd Judan Sen. Black was played by Fujisawa Hosai, 9-dan and White was Sakata. There was a 5.5 point komi. This figure recaps the opening moves (1-19) which were fully examined in Modern Joseki and Fuseki Vol. 1 (Chapter 7; page 167). With , Black has built up a huge framework of territory on the lower and right sides of the board. Although White himself has a sizable area on the left side, with prospects of more on the upper side, he cannot sit back quietly and allow Black to consolidate his area. This would be a perfect way to lose the game. Hence he must adopt an aggressive policy and resolutely invade Black's territory. The various means open to him form the content of the first part of this chapter.
 Erasing a kogeima shimari
Dia. 1 (The time is now!)
As we have already indicated, it's about time White does something regarding Black's huge moyo. However, this moyo is very deep so White must be very cautious.
There are several feasible plays, all of which are concerned with the kogeima shimari in the lower right corner. There are the tsuke of and the boshi at and the kata at . White's next move must be somewhere hereabout because if he allows Black to play at his opportunity will be gone forever.
 |
Dia. 2 (Shita-tsuke: attach underneath)
The shita-tsuke of White is not very good. Black can respond by playing at or with hiki at . Both of these responses confine White to the corner or the left edge and in either case White will be dissatisfied as Black is too thick on the outside. In any case, the problem here is Black's central strength so White lacks relevance.
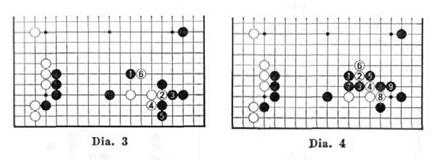
Dia. 3 (Yoku-tsuke: side attachment)
The yoko-tsuke of White is another possibility but with the sequence up to , Black builds territory on the lower part of the board. In addition to this, due to the presence of Black , the three White stones are heavy. Therefore White is also ruled out.
 |
Reference Diagram (The point of keshi)
In this position, the boshi of White is universally recognized as the essential point for erasing the kogeima shimari. It can be stated in the form of the following rule: “With a double-wing formation based on the kogeima shimari, the vital point is White ”. In the actual game this move was not chosen but it is nonetheless important to study the consequences of this move.
Against White , Black has two ways to respond: the kosumi at or the keima at
Dia. 1 (Kosumi)
After Black plays the kosumi of in reply to the boshi of White , there are several continuations and one of these is for White to play kikashi with and and then run lightly out into the center with . This seems reasonable but one must think in terms of the whole board. Given the present position, this course is not so good as now Black can play at to create a large territory in the upper right, and at the same time it leaves the four White stones rather insecure.
Dia. 2 (Still insecure)
In this case, White plays and to establish a base along the side. However once again. Black can play the tobi of forming a large area in the upper part while White's position appears to need one extra move to make it completely secure.
Dia. 3 (A pillar of stones)
The tsuke of White is normally the right way to play but in this case Black has the strong move of at his disposal. When White connects at , Black will attack at and it cannot be denied that White's " pillar of stones" looks exceedingly heavy. There is one consolation, however, in that it cannot be attacked too severely.
Dia. 4 (White makes sabaki)
Even though the White stones have become heavy, it is comparatively easy to make sabaki with the ni-dan bane tesuji of White and . The sequence continues up to with White getting sabaki, but Black is not worried as his right side has been strengthened.
Dia. 5 (Black becomes overconcentrated)
After the ni-dan bane of White , it is a mistake for Black to cut with because now he will suffer the ate of and . When Black connects at , his stones will have become overconcentrated. On the other hand, White can neatly make sabaki with a kaketsugi at .

Dia. 6 (Suji)
When Black answers White with the kosumi of , there is a special suji availablein which White shifts to the tsuke of . The idea behind this move is to wait and see how Black responds and then decide upon a strategy. However, please hear in mind that this is alocal suji and cannot be construed as a tesuji for the whole board.

Dia. 7 (Black plays submissively)
Should Black submissively draw back with the hiki of , White will play up and out with the hane of . Black, it seems, has allowed himself to be pushed around and White has had everything his own way.
Dia. 8 (Cross-cut)
Black may therefore want to play more aggressively and one such way is with the osae from the outside at . White's cross-cut at is to be expected and virtually guarantees him a sabaki shape.
Dia. 9 (Kikashi)
If Black captures the tsuke stone with the kakae of , then White and are kikashi and this is enough to make White happy. Finally, when White plays , his stones are almost safe. Also he could play tightly at , instead of , attaching little importance to the stones which were kikashi.
Dia. 10 (Unreasonable)
Against the cross-cut of White , it is unreasonable for Black to play nobi at . White can easily break through with and and now Black is in trouble.
Dia. 11 (Depends on the shicho)
Black can also play ate with , on the outside, before capturing with , but now there is a shicho to consider. In this case, the shicho favors White so he will play from to without hesitation.
Dia. 12 (Inner osae)
How will White play if Black plays the osae from the inside at ? The hane-age of followed by is not as good as it looks for the White stones are actually too heavy,
Dia. 13 (Sequence)
To understand Dia. 12, let us consider the order of moves in reverse. If Black had countered the tsuke of with the hiki at , the hane of White would be a heavy move because of the presence of Black .

Dia. 14 (White conies under attack)
Well, instead of in Dia. 12, suppose White plays kaketsugi at as here. Now because he has the stone at , Black can launch a strong attack with and . While it may not be difficult for White to make these stones live, he must remain apprehensive lest the attack enables Black to build up his already substantial moyo in the upper part of the board.
Dia. 15 (Tesuji)
Against the osae of Black 1, the cross-cut of White 2 is the one and only tesuji by which he can make sabaki. White's idea is to try and avoid provoking a Black play at the vital point of 'a1.
Dia. 16 (Sabaki)
If Black takes the corner with 1, White can play kikashi at 2 and 4. Of course after the kaketsugi of White 6, the attack at 'a' still remains, but White is satisfied
to have forced Black to play at 5 and In addition he is sure of at leasr one eye on the side of the board, Dia. 17 (Comparison)
In this diagram we can see the result of Dia. 13 and comparing it with the last diagram, we quickly see why Dia. J 3 is considered a failure. The source of White's insecurity is the threat of a Black ate at *a\ Being short of eyes is a problem never to be dismissed lightly.

Dia. 18 (Break through)
If Black takes the outer stone with 1, it is natural that White will hreak into Black's corner with the ate of 2 and the connection at 4. Black will now probably play nobi at 5 to avoid a White ate at that point and White gets tt sabaki shape quite easily by playing ushi at 6.

Dia. 19 (Black oshi)
Should Black choose to play oshi at 5 instead, White will first play kikashi at 6. Now when White goes back to play nobi at 8, this move is not so painful for him to endure because he has the beginnings of an eye-format ion in the corner in contrast to the previous diagram, i.e. White must not fail to play 6 in Dia. 18 because then he will suffer the oshi of Black 5 in Ihis diagram and the result would be hideous. Dia. 20 (Hasami-tsuke)
When Black plays the osae of 2 from the inside, there is also the possibility of White playing hasami-tsuke at 3. If Black connects with 4, White links his stones with the osae of 5 and Black has allowed himself to be forced all the way. Dia. 21 (Black is bad)
If Black plays elsewhere following Dia. 20, White can play de-giri with I and 3. Black must now connect with 4 and then White can play 5 to make sabaki with sente. Of course, Biack must not play ate with 4 at *a'. Dta. 22 (White is satisfied)
As Black must not play tenuki, he may cut with 1. The sequence continues to the kaketsugi of White 4 and this is the same as Dia. 9. Once again White is satisfied but on the other hand White can play his move 4 elsewhere if he wants.

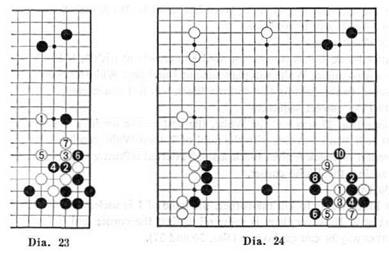
Dia. 23 (Boshi)
The boshi of White I (instead of 4 in Dia. 22) is a light play aiming at making sabaki. Now if Black cuts at 2, White gets sabaki with 3 and 5. There are probably other ways in which Black can launch a counter-attack but in this instance we have emphasized sabaki. Dia. 24 (White is in trouble)
However, there is one danger inherent in the hasami-tsuke of White 1 and that is a possible counter-attack by Black with the nobi at 2. Thrusting through with
White 3 is natural but if White persists with 5 and 7, he becomes prey to moves like Black 8 and 10. Now White is in trouble. In cases like this it is well worth remembering that with all its innumerable variations, Go is an unpredictable game and one must always be oo guard against complacency.
Dia. 25 (Nobi)
Against the tsuke of White 3, Black can also defend with the nobi of 4. Dia. 26 (White can live)
White can live in the corner with the hane of 1, the sagari of 3 and finally the kakctsugi of 5. However, it is not in White's best interests to make such a small corner. Black's external influence is much too great. This is something that White must take into consideration.

Dia. 27 (Ko)
When White plays 1, Black has the stronger move of 2 at his disposal. After White 3 and 5, the corner results in ko. However it is perhaps better for Black to defray playing at 'a' and simply connect at 6 to get rid of any aji. In any event, even if the sequence from 1 isn't played immediately, Black isn't dissatisfied as he can get a solid outside influence. Dia. 28 (Vital point)
After Black 2, it is feasible for White to craw] out with 3. If Black takes the corner with 4 and 6, White will play hanc at 7 and now White © is occupying the vital point. In the fighting that follows Black will feel constricted. Dia. 29 (The correct sequence)
Since Dia. 27 was bad for White, the best course for him is immediately to play at 1. If Black answers with the nobi of 2, then White can live with 3 and 5. The magari of Black 6 gives Black a solid external influence but this move is not sente against the White corner. Dia. 30 (Aji)
If Black wants to kill the comer, the hane of 1 is useless. White can live by playing at 2. However there is some aji against the corner and if Black plays 1 in another way he can get ko (see Dias. 36 and 37).

Dia. 31 (The vital point for attack)
Continuing from Dia. 30, the vital points for attacking the corner arc the oki of Black I and the tsugi of 3. But in spite of this, the attack fails. The correct response for White is to play horikomi with 4 and then osae at 6. Dia. 32 (Life)
Continuing from the previous diagram; when Black plays sashikomi at 7, White takes two stones in the corner with 8. Of course White could have lived and saved his two stones by connecting at V but then Black 'b' becomes kikaslu.
The following three diagrams are for your reference. Dia. 3.1 (Unconditional life)
This is the same as Dia. 26 and as we saw White lives without problems. 1)1: 1. 34 (Ko)
However, when the exchange of White fy and Black © has taken place, the corner degenerates into ko. Dia. 35 (Still unconditionally alive)
But in this situation, even if White exchanges @ for Black ©. the corner is *iil! unconditionally alive. However it must be remembered that such an exchange is not good for White and a careful examination of Dias. 31 and 32 will give the reader a clue as to why.

Dia. 36 (Ko?)
In this configuration (sec Dia. 29), the oki of Black 1 is tesuji. White responds with 2 and after Black 3 and White 4, a ko develops. But is this really the best end product 7
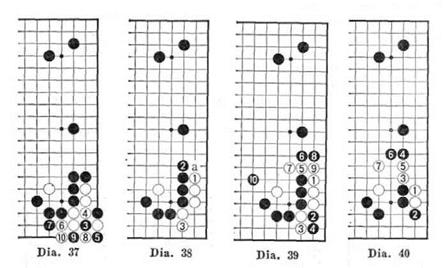
Dia. 37 (A one move yose ko)
When Black plays 3, White should instead cut with 4. Now after the sequence with the horikomi of White 8 and the osae of 10, it becomes a 'one move yose ko' In other words, this is not yet a real ko as White has a move to spare and he can consider that he is already alive. However, such cases can become useful as aji later on and should not be forgotten. Dia. 38 (One more point)
If White doesn't like the results in the previous diagrams, he can still play along the second line with 1. After Black 2, White lives with 3 and as you might expect. Black is not loo happy. Not only has White gained a large life in the corner but now the osae by Black at 'a1 is ineffective. Dia. 39 (Conflict)
Because of the result in the previous diagram. Black may take the corner with 2 and 4, permitting White the hane of 5. The sequence continues up to the keima of Black 10 and it looks like White has a difficult fight on his hands. Hence, White 1 may be unreasonable in this situation. Dia. 40 (Lukewarm)
If Black plays osae on the inside with 2, against the hai of White 1, the hanc of White 3 is the only feasible move. When Black presses with 4, White easily defends with 5 and 7. But in retrospect it seems that Blaek 4 is a little lukewarm.
Dia. 41 (Sen re)
The hasami-tsuke of Black 1 is much more severe. After White 2, Black 3 deprives White of a base of operations and drives him out into the center. White is now in a difficult position. The tsukekoshi of White 'a' seems ominous but in the present position if Black connects at 'b' it comes to nothing. However, there is some aji hereabouts and Black must always keep it in mind. Dia. 42 (Hiki)
In response to the tsuke of White 3, another variation starts with the hiki of Black 4, This move also emphasizes outer thickness and White is hard put to make sabaki. Black is prepared to leave things as they are and wait to see how things will develop. Dia. 43 (Heavy)
To play White 1 straight away seems a little heavy. After Black 2, when White defends at 3. he suffers the Black attack at the vital point of 4 and it seems as if his difficulties have just begun. Dia. 44 (The way out)
ir While intends to move out, it would seem better to play the ogeima of 2 as soon as Black plays the hiki of 1.
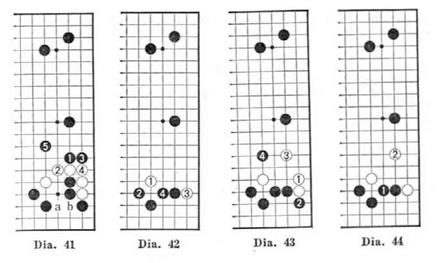
Din. 45 (Flexible)
Continuing from the previous diagram, if Black plays 3 to immobilize the White tsuke stone, White can now play kikashi with the kosumi of 4. Finally, after Black connects at 5, While makes sabaki with 6, Dia. 46 (External inHuence)
When White plays nobi with 1 as in Dia. 43. Black may choose to emphasize external influence by playing the kake of 2, Following the exchange of White 3 and Black 4, White will be able to live in the comer with the keima of 5.
This ends the discussion of the kosumi response which started with Dia. I. In this section we have seen how While could respond when Black chooses to put emphasis on his lower side. Next we are going to examine the other main alternative, in which Black declares his intention to control the right side with the keima response, Dia. 47 (Keima)
Against the boshi of White 1, Biack plays the keima of 2 to put emphasis on the right side. Let us study this response.

Dia. 48 (Tsuke)
Following the keima of Black 2, the correct move for White is considered to be the tsuke of 3. Black has various ways to answer this and they are at V, 'b\ 'c' and -d\ Dia. 49 (Shita-bam-)
l-irst of all let's consider the shita-hanc of Black 1. This is the most usual response but White is able to get sabaki with the cross-cut of 2. Dia. 50 (Tuo heavy)
Instead of 2 in Dia. 49 the hiki of 3 makes White too heavy. This is because after Black plays 4 and 6, he can still aim at the dc of 'a'. Above all, we must not forget the basic policy in any kind of keshi maneuver is to play lightly and avoid heavy moves.
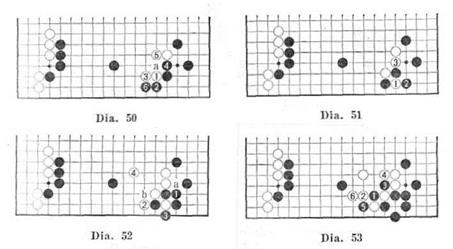
I):;;. 51 (In answer to the cross-cut)
Well, if White plays the cross-cut of I, Black usually captures with 2. But what happens when White plays the ate of 3? Dia. 52 (Kikashi for White)
If I31ack simply connects with 1, it is natural for White to play kikashi with 2. To some extent Black's shape is not so efficient (i.e. Black 1 would be better placed at 'a') hut as his corner is quite secure, it is not actually bad. For White to play lightly at 4 is good and he shouldn't worry about the cutting point al 'b'. What happens, though, if Black does indeed cut at this point? Dia. 53 (The main point)
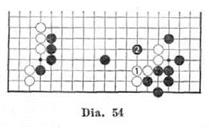
Agiiinsl the cuts of Black I and 3, White plays 2 and 4. The essential point to remember is to play hiki with 6 in response to Black 5. So while Black is being icmpted by small profit. White is becoming very thick, and this is the essence of sabaki. Dia. 54 (Target for attack)
To connect at White I is a heavy move and Black will immediately thrust at the point of 2 to render the White group eyeless. In this way. White's group has become a prime target for attack and it is now impossible for him to play lightly to got sabaki.

Dia. 55 (Same here)
The kakctsugi of White 1 is also bad. Black plays the nozoki of 2 forcing White to connect at 3 and again the whole White group falls und»r attack. It has turned out this way because White has forgotten his original purpose in piaying keshi which was to make sabaki and instead has made heavy moves along the way. Dia. 56 (Shicho relation)
Rlactc might also play the hane of 1 as here, however, when he docs so he must pay attention to the shicho relation. Black 1 is ate so White will probably connect with 2 but subsequently White too must be on his guard as the situation is fraught with danger. Dia. 57 (Shicho)
Black might next play the ate of 1 as well but he must first work out the shicho
after White 'a' and 'b\ In this case it is no good for White due to the presence of
Black ® so White must utilize some diversionary tactics in order to change the
scene of battle. One way of doing this is to play White 2.
Dia. 58 (Sabaki but___)
The idea of playing White © is to prepare for a White c-shi at the point of 1. However, if Black prevents this with a move at 1 himself, White will play hane at 2 and after Black 3, While gets sabaki with 4, 6 and 8.
However in the present game, even though White makes sabaki. he cannot be satisfied because he has allowed Black to build up the right side. Furthermore,
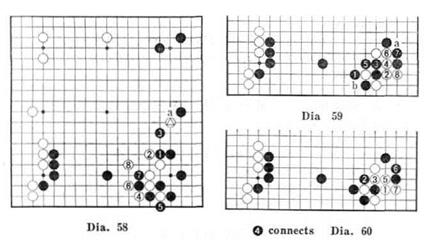
even if Black simply pays oshi at 'a', in response to White ©, it is still not good for White. We have given an example of sabaki in this situation but in practice one must consider the whole board before deciding where to play. Diu. 59 (Shicho is bad for White)
So, in such a case, when the shicho is not good for White, the countcr-atc uf 2 should be played instead of the connection of 2 in Dia. 56. If Black plays 3, White lives easily with the sequence from 4 to 8. Also White has the cut at 'a*. On the other hand. White could have played 4 at 5 and then cut at 'b'. Hut in any case, Black 3 is not good. Din. 60 (Capture one stone)
Against White 1, the nuki of Black 2 is the correct replay. Next White plays the ate of 3 and connects with 5. After the hiki of Black 6, if White plays the nuigari of 7, his shape in the corner cannot be easily attacked. Dia. 61 (Life style)
Suppose Black tries to confine his adversary with gj; White ] is a suji which gives him life. Against Black 2, White 3 gives the group eyes. In such a position, iIn1 onus is on Black to decide whether to try and confine White with a muve like © or to make him run away by depriving him of eyes in the corner. Dia. 62 (Not tesuji)
After Black has connected with 4 in Dia. 60, White may feel tempted to play the tesuji of I. However, the tsukekoshi of White 1 is not a, tesuji in this case and is in fact uncalled for. It is a bad move as it gives Black an eye-shape. Tesuji always depend on the situation.

Dia. 63 (Reckless)
Another reason why the tsukekoshi of White 1 is bad is that it is also possible for Black to cut at 2. After White 3, Black plays the magari of 4 and obtains real profit in the corner. Dia. 64 (Capture)
Now we come to the variations which develop after Black captures with 2 in response to White 1. Dia. 65 (Adjust the shape)
Continuing from Dia. 64, the ate of White 1 is natural. Black should not fight a ko in this case, so he connects with 2. After the nobi of White 3, Black captures 1 with 4 leaving his corner secure. Next White makes good shape in the center with 5. However, it may not turn out so simply for White. Dia. 66 (Trouble)
When White plays the nobi of 1, it becomes most annoying if Black thrusts at the vital point of 2. This move is well worth some study.

Dla. 67 (Dissatisfied)
With Black occupying the vital point, White must counterattack. The exchange of 2 and 3 is a loss for While but is necessary if he wishes to get out into the cemer with 4 and 6. After Black takes the key point of 7, the sequence up to White 12 ciin be anticipated but now the Black moyo on the right has become secure. In addition to this, While hasn't really accomplished anything with his own moves so he remains a bit dissatisfied. Din. 68 (Variation)
Thus White must look for other measures and after the exchange of 2 and 3, he may try the nobi of 4.

Dia. 69 (Kosumi tesuji)
Black has no course but to cut at 1. Because of White©, the kosumi of White 2 seems to be tesuji but actually things are not so simple. Dm. 70 (Hara-tsuke)
It goes without saying that the osae of White 1, instead of the kosumi of 2 in Dia, 69, is completely useless. Black 2 is the well-known hara-tsuke tesuji and White is unable to do anything to save these stones. After this, White again must turn his attention to the cut at 'a' but now there is no aji in the corner. Dia. 7] (Loses by one move)
Slack 2 and 4 are the only answer to the kosumi of White 1. Even though he plays hane at 5, White loses the fight by one move when Black plays hane at 6. Now the cutting point at V is as severe as before.

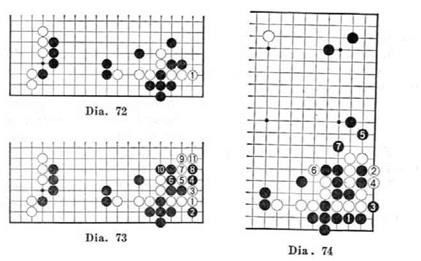
Dia. 72 (Safari)
Finally it seems as if White should forget about the kosumi of 2 in Dia. 69 and play the sagari of 1. Dia. 73 (Capture two stones)
Continuing from the previous diagram, the tobitsuke of Black 2 is tesuji. If Black plays osae at 4 in response to the magari of White 3, the sequence to White 11 with follow. White has captured two Black stones on the right but with Black 10, it appears that White has to give up all the stones on the lower side. As this would be unsatisfactory for White, we must examine this position in more detail. Dia. 74 (Dangerous)
After Dia. 73, Black continues with 1 and 3 followed by the kosumi of 5. If White now counters with the hane of 6, the Black kake at 7 also places the stones on the right in jeopardy. There is probably enough aji for these stones to live but it is difficult to tell the outcome of this fight. Overall the advantage seems to rest with Black as White must defend two weak groups.
Dia. 75 (Come from behind)
When White plays the sagari of 1, it is also feasible for Black to pursue from behind with 2. In any case, it is natural to fill up the dame as this is a semeai. Dia. 76 (Maneuvers)
In this case, White plays degiri with 3 and 5. If he wants to get these moves in, he has to play them now because it is his last chance. Dia. 77 (Shibori is no good)
It is useless for White to play the shibori of 7 and 9. The fight continues to the horikomi of White 15 but then Black cuts at 16 forcing the kosurni of White 17. After the sagari of Black 18, the situation becomes 'me-ari me-nashi' (Black hus eyes. White doesn't) so White will be captured first.

Dia. 78 (Trouble)
When White plays sagari with 1, it is dangerous for Black to play osac from the outside with 2. After this White will play osae at 5 and now Black is in real trouble. Dia. 79 (Captured)
Following from the previous diagram, Black plays 6 and then the oki tesuji of 8. Black must make an eye with 10 when White defends with the sagari of 9, but now White can cut with 11 and this allows him to get in the crucial kikashi of 15. After 17, it is obvious that White wins this scmcai by one move. Dia. HO (Conclusion)
In conclusion, the best way to play is for White to make the sagari of 1: after
the lobi-tsuke of Black 2, White plays degiri with 3 and 5.............

|

Oia. 81 (A possible development)
Black I and 3 arc necessary and after the osae of White 4, Mack secures the corner by playing 5. Next White captures one stone with the kakae of 6. Black now takes the lower silk with 7 and 9. Finally White shifts the fight to the right side with 10. This is only one possible development for you to look at because when Black plays the thrust of 2 in Dia. 66, it is almost impossible to tell how the game will progress. However, when Black omits the cut of 4 in Dia. 65, he runs a risk of leaving bad aji in the corner. A brief survey of the moves in the corner has been shown in the preceding section from Dia. 69 to Dia. 80. In most cases, White is behind by one move in the fights that occur but if he should ever manage to get a stone at 'a* or on the right side, he may be able to bring his corner stones to life. In any event, the overall situation is important and must be considered carefully by both players before deciding on which course to embark. Dia. 82 (Hane-dashi)
Going hack to the earlier problem of answering the tsuke against the shimari stone, another answer is for Black to play the hane-dashi of 1. When White cuts at 2, Black plays hiki with 3. Of course Black cannot play this way if the shicho at 4 is good for White. Please make sure of such relationships before playing in this way. Dia. 83 (Hiki)
Black can also play the hiki of 2 straightaway when it is his intention to keep things simple and uncomplicated. In reply, White jumps iightly to 3, making saba-ki. If White could make territory on the lower side, the kosuini of'a1 might be more appropriate. In any case, White may be slightly better if only because Black seems to have played too submissively.

Dia. 84 (Tsuki-atari) Di«- K8
The tsuki-atari of Black 2 is a vulgar play which is usually not good but can he applicable to cases like this. Of course Black cuts at 4. Dia. 85 (Straightforward)
The sequence from the ate of White 5 to the tsugi of Black 12 is the only reasonable one. In the present game, Black may choose this way because when he defends with 12, his profit on the right side is very! arge. Although in general one can calk about vulgar suji, it depends on the actual circumstances of each game,; t concept which is all important to Go. Dia. 86 (Ate from above)
Earlier in this discussion, we saw the kirichigae (cross-cut) of White 1 and in the previous instance (Dia. 51, etc.) this was answered by atari against the cutting stunc on the inside but now we are going to take a look at the ate against the nmcr stone. After the ate of Black 2, While plays nobi at 3 and Black connects with 4. Let's study this variation. Dia. 87 (Give and take)
Continuing from Dia. 86, the nobi of White 1 is good. In reply to the hai of Black 2, White plays the kosumi-tsuke of 3 and then the exchange of 4 and 5 takes pkiee. Dia. 88 (If Black fights..)
If Black perseveres with 2 when White plays I, it is good for White to extend w.ih 3. Should B! ack then craw! to 'a'. White will extend to'b\ Now if Black keeps on crawling. White will keep on extending. Even if the corner stones are captured. VVhite cannot lose.
Dia. 89 (Caution)
However, suppose Black has a stone at ©. Then White has no choice but to live in the corner with 3 and 5 when Black plays at 2. This is because an extension by White at *a* runs head on into Black ©. Dia. 90 (Hanekomi)
In response to the kosumi-tsuke of White 1, the hane of Black 2 is too greedy. In this case, White 3 is the best move. The sequence continues to Black 6 by necessity and after the hanekomi of White 7, Black is in ruins. Dia. 91 (Capture)
Going back to Dia. 86 again, the safest way for White to play is to capture with 1, This gives a perfect eye shape. However as this is rather small and cramped White will probably be unhappy with it. Dia. 91 (Blockade)
For example, after Dia. 91, the osae of Black 1 gives him a magnificent blockade and this is especially effective in the game we are studying.

Dia. 93 (Pillar of stones)
After the ate of Black 2, if White tries to avoid the blockade by playing 3, Black may capture with 4. Even though its head is sticking out into the center, the White formation has become a pillar without a secure foundation. So we see again how everything depends on the circumstances. Fig. 2 (20)
After all our research into the boshi of White I in the reference diagram on page 3, it seems that this move doesn't turn out so well for White in the present
panic. Consequently, While chose instead to play the kata of 20. This move too embodies the concept of keshi.
There are various Other ways of playing keshi and we will touch briefly on; i few of these before passing on.

Dia. 1 (Katatsuki)
First of all there is the kata of White I. In the present game, this doesn't work out too well as Black is able to build up a huge area on the lower right side of the board. Dia. 2 (On the other side)
It is also possible to play the kata of White 1 on the other side, but in this variation Black makes territory on the upper right side.

Dia. 3 (Uchikomi)
White ] is an uchikomi rather than keshi. but in the broader sense it is also keshi since the main intention is to lay waste Black's territory. It would however be a bad choice in this game as Black builds up the upper right side and White finds himself completely under attack. Dia. 4 (Pointless)
The uchikomi of White 1 is even worse. Now Black is building up the lower right part and White will have a doubly hard time escaping with his one stone. Dia. 5 (Natural development)
In response to the kata of White t (White 20 in the actual game), the most obvious moves are Black 2 and 4. If White plays themagariof 5, Black 6 and White 7 seem to be the most natural course of development. Dia. 6 (Thickness)
In response to themagari of White I, it is not good for Black to play the fukore at 2, because now White will force Black to craw) along the right side from 2 to 8. White has become very thick and Black never profits from this sort of exchange.

Dia. 7 (A thick move)
If Black wishes to avoid the magari of White 1 in the previous diagram, he may play one more oshi at I. White will naturally play nobi at 2. After the suberi of Ulack 3, White again plays magari at 4 but now White is thicker since his magart is one line higher than before. Dia. 8 (Sabaki)
Since White is thicker than before, he can now play the kake of 1 if he gets the chance. White expects Black 2. against which he side-steps by playing at 3. Please try to grasp the feeling of sabaki here.

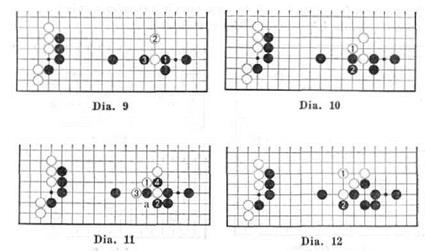
Dia. 9 (Too thin)
In answer to the oshi of Black 1, the tobi of White 2 is also possible. The sequence comes to a temporary halt after the hasamitsukc of Black 3. In this example. White has achieved his purpose of playing quickly and lightly, however he suffers the disadvantage of being thin. After this. White really doesn't have any good moves in this area. Din. 10 (Kikashi)
White might try the haneoft. If Black answers with thesagari of 2, then White 1 has become kikashi. Bear in mind that Blatk 2 is not ihc only way of answering but it has the virtue of avoiding complications. Dia. 11 (Atari)
For instance. Black could play the ate of 2. White counters with another ate and Black captures with 4. Note that White must on no account play ko at *a\ Dia. 12 (Fruitless)
Later, when White has to play the kaketsugi of t, Black will play watari with 2. On the one hand Black has secured a large profit on the lower side, while on the other hand White has accomplished next to nothing, ll would have been better if White had never played these moves.
|

Din. 13 (A huge fight side)
In Dia. 11, we said that White must not force a ko. We show here what is likely to happen if he docs. After White I, Black cuts with 2 and the sequence contines to the nohi of Black 8. As a result the Black moyo on the right side lias becomes incredibly bulky. There would be some relief if White could attack the Black stones on the lower side, but in the present circumstances he is unable to. Hence we must conclude that this was not the right position for this method. Dia. 14 (Too low)
Black hesitates to play the oshi underneath at 2 in response to the Icata of White 1. This is because his posture is too tow and now the tobi of White 3 becomes a good move. Dia. 15 (Tesuji)
After White 1 and Black 2, White can also shift the scene of action to the tsuke of 3. This move is a kind of tesuji. In some cases it is effective, but in the present position it loses the initiative for White after Black 4.

|
Hr. 3 (21-23)
Black attacked by jumping to 21. This way does not correspond to our previous studies but then every game has its own unique way. It looks as if both players; irc trying to frustrate the other's intentions. Black 21 may be somewhat thin but the purpose of this move is to keep one step ahead of While and to aid in the development of the moyo on the right side. The same applies to the keima of Black 23. Dia. 1 (Aji)
By defending himself at © (22 in Fig. 3), White manages to stretch his legs, so to speak, and reinforce himself. This leaves the aji of 1 and 3 for later, but first of all. White must escape or find life for his stones on the left. Dia. 2 (Very bad)
Tor White to play 1 and 3 is a typical example of a vulgar suji. In the sequence up to Black 10, Black becomes solid while White loses all the aji in the corner and his stones still remain under attack.
Dia. 3 (Boshi)
In the current position, the boshi of Black 1 is unjustifiable. After preparing lhe way with 2 and 4, White gets out with the tsuke of 6. Black is now chasing White towards the Black territory on the right side and his dreams of building a moyo there are shattered. Dia. 4 (Insufficient preparations)
However, if White doesn't p! ay 2 and 4 In Dia. 3, but simply pushes out with the tsuke of 2 backed by no preparation. Black can persist with his attack with 3 and 5 and then connect with 7. At this point, White 8 is inadequate since it is nullified by Black 9.
Dia. 5 (Even worse)
If White cuts with 4 as here, Blaek will play the ate of 5. The sequence continues to the nobi of Black 11, but in this case it is even worse for White, since Blank's right side is strengthened and White can escape only with a false eye. Dia. 6 (Ni-dan bane)
The kake of Black 1 is also bad as White will answer with the ni-dan bane tesuji of 2 and 4 and now White's stones are running away right into Black's potential territory. Fig. 4 (24-30)
When Black plays the hane of 25, he is aiming to secure a large piece of territory on the right side. The sequence to (he sagari of Black 29 is to be expected and when White runs away with the keima of 30, he is aiming at the cut of 'a'1 In any event, both players show their preoccupation with the right side.
Dia. 1 (Slrantje way to play)
In response to the sagari of Black 1, the osae of White 2 is a strange style ot playing. Black will never play at 2 because this, in combination with Black ©, would make a double nozoki against a bamboo connection. Hence, there is no sense in playing at a point where Black has no intention of playing either. Dia. 2 (Alternative)
If White wants to play towards the left, the proper move is the tobi of 1. However, after Black 2 ami White 3. Black gets the lead with 4. These are the reasons why White played 30 in Fig. 4.

DIa. 3 (Degiri)
Of course when White plays I, Black cannot play the degiri of 2. If this were possible, White would never have played at I. With the sequence to White 11, the two Black stones on the bottom are captured and the Black group on the left finds itself in a ridiculous position. Furthermore, with the cutting point at V, Black's position is untenable. Din. 4 (Consistent)
However, when White plays ©, Black ean play the narabi of 1 reinforcing the cutting point at *a' and at the same time emphasising the moyo on the right side. With this move. Black's strategy is consistent. However, on the other hand. White can play kikashi with 2 and for Black to have to answer at 3 will be rather painful for him. ViS, 5 (31-37)
Black 3J aims at nullifying the effect of a White kake at the point of 32 (see previous diagram). White 32 is a sacrifice stone with which he intends to make good shape while still keeping his eyes on the cut at 'a'. This cutting point is the focus of the present maneuvers. First of all, White plays at 36, but Black unexpectedly resists with 37 and now the position becomes very complicated.

Dia. 1
One of the ideas behind Black 1 is to try and make White play at 2, thereby provoking Black 3. This will eliminate the cutting point at 'a' and so under no circumstances should White play at 2. Dia. 2 (Hasami-tsuke)
The tsuke of White 2 looks like a tesuji but it isn't any good either. The cutting point is again eliminated and after Black 5, the area on the right side is very large. This cutting point constitutes bad aji for Blaek, and White must try to utilize its existence, combining it with other threats. To eliminate such bad aji is bad policy and such moves are referred to as *aji keshi'. Dia. 3 (Hidden meaning)
When White plays 1 (36 in Fig. 5), his hope is that Black will play 2. Next White plays magari at 3 forcing Black to defend with 4. It is now possible to cut at 5. Dia. 4 (Big hole)
Continuing from Dia. 3, if Black plays 2, the sequence proceeds up to White 9 and a large hole has opened for White on the right side. There may be other variations, but whatever happens Black is sure to be bad. The last two diagrams serve to show how threats made against one group can tie in with the bad aji at some other point. Please think carefully about this concept as it is of fundamental importance in Go strategy.

Dia. 5 (Real profit and safety)
So lifter the magari of White 3, Black must play the narabi of 4. If such is the case, White will capture with 5, gaining real profit and security. Furthermore, Black has lost his chance to attack the White group. Dia. 6 (Counter-attack)
Black plays 1 as a counter-attack and its aim is to cut at 3 if White plays the
osae of 2, After the moves up to White 6, Black cuts at 7; now White has two groups in trouble and is completely lost. Consequently, the osae of White 2 cannot be played. Viii. 6 (38^1)
The sequence to Black 41 is the only one possible but each move is very risky. It is like treading on the tail of a tiger, with White the more apprehensive about what is going to happen.

Dia. 1 (Central dominance)
If Black cuts at 2 in response to the hane of White 1 (38 in Fig. 6), the sequence from 3 leads to the cut of White 7. Although Black can succeed in catching the four White stones by cutting at 8, he has suffered greater damage because White eun now play up to the kakac of 13 to establish a base in the center. Dia. 2 (Accrued interest)
[f instead of the sagariof4 in Dia. l.Blaek plays 4 as here, White will be course capture one stone with 5 to make a living shape in the corner. White is satisfied and will now run lightly away into the center.

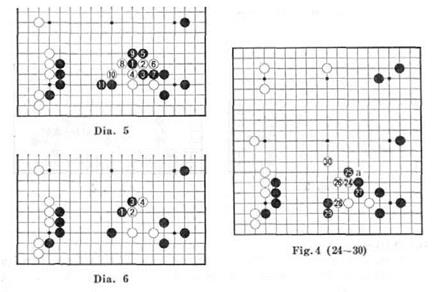
Fig. 7 (42-47)
White does not want to play the sagari of 42 but it is unavoidable, being preparation for the cut at 44. Both Black and White are involved in serious in-fighting but when Black plays the osac of 47 the problem is gradually becoming bigger and bigger. The fight is so fierce that it is impossible to tell which side will win. Dia. 1 (Instead of White 42)
In place of 42 in Hg. 7, it would be nice if White could simply cut at 1 as here. However he would then be seriously pressed by Black 2 and after Black 8 it is clear that the White stones die. Dia. 2 (Instead of Black 47)
If Black plays the osae from the outside with I, as here, White will easily live in the corner with 2. It is obvious that Black has lost out in this sequence because his area on the right has been significantly decreased and in addition he now lacks an efiecti-ie attack on the White group in the center.
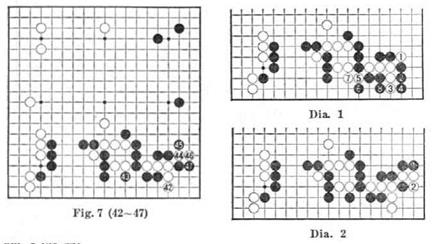
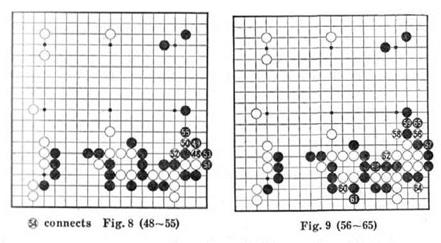
Fig. 8 (48-55)
As might have been expected, this has now become a very severe fight. White 48 is the only move and the shibori sequence to the watari of Black 53 follows quite naturally. Black plays 55, fully aware that it might be the source of bati aji for him, but by this time he is almost desperate. If White should escape, it could spell his doom. However, tt is still too difficult to tell how this fight will turn out. Fig. 9 (56-65)
White 56 and 58 are kikashi which give White some breathing space. White 60 was a very astute move. No one else realized it at the time but the key to the whole game seems to have lain concealed at this point. Next White 62 is kikashi and with the tsuke of 64, White just manages to get life in the corner. To be sure. White's life in the corner is not unconditional but with the bewildering changes taking place on the board, neither Black nor White has time to worry about the corner.
Dia. 1 (l-ire hazard)
In response to White © (60 in Fig. 9), if Black, plays 1, White will play 2 and 4 and he still has the chance of making watari at 'a'. But what is most serious of all islhat the Black group on the lower left will probably catch fire. Black just can't go through with 1. Dia. 2 (Ko)
After Fig. 9, the White group in the lower right corner is alive with ko. The key point is the tsukc of ]. After White plays 4, it is ko. There is however a problem of timing and Black can't play here too soon. This complication makes the ensuing light all the more difficult.

Fig. 10 (66-77)
White jumps to 66 and Black matches him with a jump to 67. The position has now become what is known as a 'ryo-garami' (a double intertwined battle). It is a fight with no breathing space, a real life or death struggle. If White fails to jump out to 74, the Black kake of 75 will be very dangerous. Black then plays 77 lo snatch away White's eyes and the conflict unfolds. Dia. 1 (Effective)
Black 67 in Fig. 10 is most effective. Suppose that Black had played 1 and 3, as here, instead. In this case, White doesn't have to play at va* in reply to Black 5. In Fig. 10, the result was that White was made to play at V, which eventually turned out to be an awkward move for him. Dia. 2 (The cut)
White should not cut with 1, as in this diagram, instead of playing 68 in Fig. 10. After Black 2, 4, and 6, White may well be able to live but he is sealed in. In addition. Black need not worry about his group on the lower side as long as the watari of 'a* remains. Now the White group in the center is open to severe attack.

Fig. 11 (78-82)
The connection at 78 is natural; White can hardly be expected to answer at 'a'. The pressing move of Black 79 was a bit dubious. Black it seemed had some doubts about his central group in the fighting that must follow. Now the complexity of the fight has decreased but it is still serious. Dia. 1 (One line difference)
Instead of 79 in Fig. ll.it might have been better for Black to attack with 1 as in this diagram. After White 2, Black can play the nobi of 3 and the right side becomes his, for the reason that White cannot now play at 'a'. If White plays 4

utkI 6, the nobi of Black 7 has a somewhat serious effect on the White group in the center. This is only a difference of one line but the difference between profit 'and loss is not so slight. Ilia. 2 (Mane)
The nobi of White 82 in Fig. 11 is the correct move even though it may seem.i little slow. If, instead, White plays the hane of 1, he will have difficulty finding a good answer to the hiki of Black 2. If he strengthens the cut at 'a' with the tsuki-ulari of 3, he is stiil in trouble after the nobi of Black 4, In addition to this, the White group in the center is getting more isolated move by move and its prospects arc not so good. Dia. 3 (Forceful)
White is also apprehensive about Black 2 and 4 after the hane of 1. White pkiys 5 and 7 but Black can defend at 8. Now White is up to his neck in trouble. I fence we see that the nobi of White 82 in Fig. 11 is necessary.


Fig. 12 (83-90)
Black's erroT when playing 79 in Fig. J1 becomes more apparent in this figure. Thai is to say, the attack from 83 to 89 has the effect of driving White into Black's territory, thus greatly diminishing it. Black has only one recourse and that is lo capture the White stones. But 90 is the right move to get White out of danger. The two hanc at V and 'b' are miai. Dia. 1 (Last gasp)
White must not play the nobi of 2 in response to the hane of Black 1. Black in this case will play 3 and 5 and White dies as we can see in the next diagram. Dia. 2 (Impossible)
This sequence shows how futile it is for White to try and live. In response to the osae of White 1, Black simply connects at 2. When White jumps to 3, Black 4 removes all hope of making eyes. Dia. 3 (Also useless)
To play White 3, after 1, also fails since Black plays the kosumi of 4 and again White cannot make eyes. 3 and 4 are points of miai.

|
l)i; i. 4 (Loose)
However, for Black to connect at 1 is a loose play. White 2 and 4 are the same as before, but now after Black 7, White has the hanedashi of 8, which presents Hlatk with a very difficult problem to solve. l-ic 13 (91-100)
Black can do little but play nobi at 91 and hold back his tears while White emerges with 92. Of course Black isn't about to give up his attack and so he presses on, sticking close to White with 93 and 95. White 98 looks like a connection but Hlack plays tsuke with 99 and redirects his attack against White from this direciion. The tsuke of White 100 is a probing move.
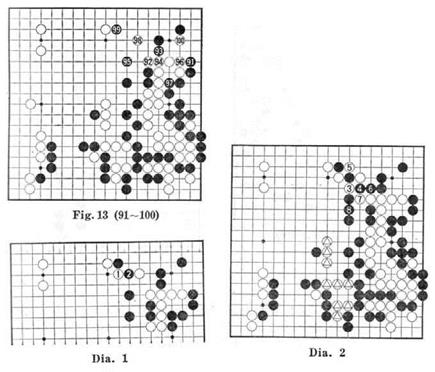
Hia. 1 (Uanekomi)
The meaning behind the tsuke of Black 99 in Fig. 13 is that if White plays the hane of 1, Black can disconnect with the hanekomi of 2. Dia. 2 (Cut off)
Continuing from Dia. 1, if White then plays 3, the sequence with Black 4 and 6 will cut off the large White group. If White then plays 7. Black will firmly bolt the gate with 8. On the other hand, if White plays 3 at 7, Black will connect at 3; ind then at 8. He gives up two stones but now his shape is perfect for an attack on the White group marked @ in the center.
Fig. 14 (101 108)
Black 1 through 5 are natural responses. White 8 is a move for which he has been preparing. He plays 8 in the hope that Black will respond defensively. Dia. 1 (Becomes kikashi)
If Black defends with © against White @, this will permit White to play the hane of 1 after all. When White plays 5, Black 6 doesn't work anymore since it has been foiled by the cut of White 9, This illustrates that White © is quite a timely move. Dia. 2 (Black captures ©)
Of course Black can capture White © with I and 3, but again after 4, White is able to play the hane of 6.

Dia. 3 (Alive)
If Black replies with 1, White can also play 2 and 4 which give him a living shape. Furthermore, Black will be more than a little apprehensive about his corner as White can play the hane of 'a', isolating the Black group in the corner. Dia. 4 (Annoying)
However after Black 3, White must not play hane at 4. If he does then Black can play sagari at 9 when White plays ate with 8. Next Black cuts at 11 and this move is doubly potent as it tan be thought of as leading to an attack on the White stones in the center of the board. Fig. 15 (109-118)
While is out and the game is almost his. However the real cause of Black's defeat was in the way he rushed to make territory with 9 and 11. White 14 is tesuji and the connection of Black 17 is unavoidable. Black has recovered much of the territory he lost in the upper part of the board but actually he had a much better way to play.

Dia. I (Continuity)
Instead of 11 in Fig. 15, it would have been preferable for Black to have played I as in Ihis diagram. After White defends with 2, Black can press on with an attack against the central White group with 3. At any rate, it was quite understandable that Black, having lost so much ground, should start worrying about territory. It is impossible to say how the game would have finished if Black had attacked with 3 but this variation has more potential. Actual profit is permanent but that is all. If this profit is not enough to win then more risky maneuvers must be employed. Oia. 2 {The reason for Black 17)
Why did Black play 17 in Fig. 15 and not the oshi of 1, as here? The reason is the tesuji of White 2, against which Black must defend at 3. Next White cap-lures three stones with 4.


Dia. 3 (Tesuji)
After White plays 2, Black cannot connect at 3 for if he docs, White will play the horikomi tesuji of 4 and after White 6, Black cannot prevent the loss of at least three stones. Fig. 16 (119-124)
I consider Black 19 to be the decisive mistake. In order to maintain the territory gained by 19 and 21, Black 23 becomes necessary. White plays 24 and the tables are turned. It is now Black who is subject to a severe attack. Dia. 1 (Last chance)
Instead of 19 in Fig. 16, Black should have started an attack with 1, as in this diagram. If White plays the tobi of 2, Black will play 3, cut with 5 and then make the nobi of 7. This was Black's last chance to launch such an attack and force White to run away in order to seek life. In this way. Black would have been able to start an invasion against the White territory on the left side. Of course it still can't be said that Black would win. but at least the game would be difficult and Black would get a new lease on life. Don't forget that Black stitl has prospects of playing ko in the lower right corner. Dla. 2 (Black 23)
Black 23 in Fig. 16 is absolutely necessary. If he plays the nobi of 1, as here instead. White wili play 2. After the tsuke of Black 3, White plays sagari with 4 and ihe points 'a' and 'b' are miai.
Dia. 3 (No danger of a cut)
Please note that in Fig. 16, White can play 24 without worrying about the gut of ISJack 1 in this diagram. Should Black cut, White will merely make another eye with sente and then go back to attacking the Black group in the center. lie 17 (125-131)
The painful part of White's descent at © is that the Black jump to 25, instead of being an attack, has, on the contrary, become a means of escape. Go has a terrible aspect; it only takes one small cog-wheel to go out of order for the whole structure to be damaged. Fig. 18 (132-138)
White is able to extricate himself comfortably with the tsuke of 32 and 34. Bkick tries to run away with 35 but actually he has no place to go with every exit blocked by White stones. Next, White makes perfect shape for a connection with 36. Black plays 37 and White neatly checks this stone with 38, a move which also aims at the large central Black group.

Fig. 19 (139-143)
Black 39 and 43 are an attempt to do something but these moves do not enter deeply into the left side and constitute no more than an irritation. Against White 40, withdrawing with 41 is painful for Black, but he has no choice as he has to think about eyes. White calmly gathers profit with 42 and Black's grave position is evident u> all. Dia. 1 (Black 41)
If instead of Black 41 in Fig, 19, he had played the tsuki-atari of 1 in this diagram, the tsukc of White 2 at once makes his eye-shape uncertain. If Black connects with 3, White plays shibori from 4 to 8 and Black doesn't have enough time to save his three stones. He would have to resort to playing 9 in order to make a base for his §roup. However, White will take this opportunity to make unconditional life in the corner with 10, 12 and 14 and the ko is eliminated.

Dia. 2 (Invasion)
With 39, Black would have preferred to have invaded more deeply with 1 in this diagram. But when White plays the hoshi of 2, the large Black group is endangered. Black would then have no choice but to play the tsuke of 3 and try to live by means of ko. This is a very large ko, which, if Black loses, will lead to the death of his whole large group. Hence, regret it as he may. Black cannot afford to invade so deeply. Fig. 20 (144-153)
White 44 is a sacrifice play to stabilize his shape and this is just the right time for such
|
|